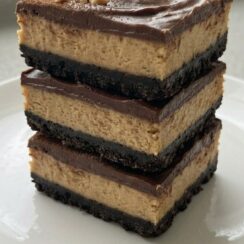
Easy Homemade Chocolate Peanut Butter Cheesecake Bars for Any Occasion
These Chocolate Peanut Butter Cheesecake Bars are rich, creamy, and packed with the perfect combination of chocolate and peanut butter in every bite. 🍫🥜
Servings 16
Ingredients
Crust
- 30 regular Oreos
- 113 g unsalted butter melted (½ cup or 8 tbsp)
Peanut Butter Filling
- 675 g full-fat brick cream cheese softened to room temperature (24 oz or 3 packages)
- 200 g granulated sugar 1 cup
- 60 g sour cream or plain yogurt room temperature (¼ cup)
- 250 g creamy peanut butter not natural style (1 cup)
- 5 ml pure vanilla extract 1 tsp
- 0.5 g salt ⅛ tsp
- 3 large eggs room temperature
Chocolate Topping
- 113 g unsalted butter ½ cup or 8 tbsp
- 200 g semi-sweet chocolate chips about 1 heaping cup
Instructions
- Begin by preheating your oven to 350°F (177°C). Line a 9×13-inch baking pan with parchment paper, making sure the paper comes up the sides with enough overhang to lift the finished bars out easily. Set the prepared pan aside.
Prepare the Oreo crust:
- Place the Oreos, including their cream centers, into a food processor or blender. Pulse until they become fine, even crumbs. You should have approximately 3 cups, or 330g, of cookie crumbs.
- Transfer the crumbs to a large mixing bowl and pour in the melted butter. Stir thoroughly until the crumbs are evenly moistened. The mixture will be quite thick and damp, so break apart any larger pieces as you mix.
- Tip the crumb mixture into the prepared pan. Using the palm of your hand, press it firmly and evenly across the bottom of the pan until you have a compact, substantial crust.
- Bake the crust for 10 minutes. Remove it from the oven and set it aside, but keep the oven turned on.
Make the peanut butter cheesecake layer:
- Place the softened cream cheese and granulated sugar in a large bowl. Using a stand mixer fitted with the paddle attachment or a handheld electric mixer, beat on medium-high speed for about 2 minutes, until completely smooth and creamy.
- Add the sour cream and mix until incorporated. Follow with the peanut butter, vanilla extract, and salt, beating until the filling is smooth and everything is evenly combined.
- Reduce the mixer to medium speed and add the eggs one at a time. Mix just until each egg disappears into the batter before adding the next. Once the third egg has been incorporated, stop mixing. Do not worry if you see a few tiny lumps. Give the mixture several gentle turns with a whisk by hand, paying particular attention to the bottom of the bowl, to remove any larger pockets of unmixed ingredients.
- Pour the peanut butter cheesecake mixture over the baked Oreo crust. The crust can still be slightly warm at this stage. Use a rubber spatula or the back of a spoon to spread the filling into an even layer. It will look quite thick, which is exactly what you want.
- Bake for 35 to 38 minutes, or until the cheesecake looks set across the surface and the edges have developed a light brown color. A few small cracks around the edges are perfectly normal. The cheesecake will puff up while baking and settle slightly as it cools.
- Place the pan on a wire rack and allow the cheesecake to cool at room temperature for 1 hour. Transfer it to the refrigerator and chill for at least 3 hours, or as long as 1 day, before adding the chocolate topping.
- If you need to speed things up, you can chill the cheesecake in the freezer for about 2 hours, or until it is thoroughly cold. For longer refrigeration, loosely cover the pan with aluminum foil after the first 3 to 4 hours.
Prepare the chocolate topping:
- Cut the butter into tablespoon-sized pieces and place them in a heatproof bowl. Add the chocolate chips on top.
- Microwave the mixture in 30-second intervals, stirring well after each interval, until the butter and chocolate have melted into a smooth, glossy mixture. Alternatively, melt them together in a saucepan over gentle heat, stirring continuously until smooth.
- Allow the chocolate mixture to cool for 2 to 3 minutes. Then pour it over the thoroughly chilled cheesecake and spread it gently into an even layer.
- The cheesecake may naturally have a slightly raised edge with the center sitting a little lower, which creates a convenient border for the chocolate topping. If your cheesecake does not have this raised edge, simply spread the chocolate evenly across the entire surface.
- Return the bars to the refrigerator for 50 to 60 minutes, or place them in the freezer for about 30 minutes, until the chocolate layer is firm and completely set.
- If you plan to refrigerate them for longer than an hour, loosely cover the pan with aluminum foil after the topping has set. The chocolate must be fully firm before you attempt to cut the bars.
Cut and serve:
- Once chilled, use the parchment paper overhang to carefully lift the entire cheesecake from the pan. Place it on a cutting board and use a sharp knife to cut it into squares.
- For beautifully clean edges, wipe the knife with a clean towel after every cut. It takes an extra moment, but it makes the finished bars look wonderfully neat.
- Store any remaining cheesecake bars covered in the refrigerator for up to 1 week.
Make-Ahead & Freezing
- These cheesecake bars are excellent for preparing ahead. You can complete the recipe through the cheesecake-filling stage up to 2 days in advance. Cover the unbaked cheesecake tightly and refrigerate until you are ready to bake. Because the cheesecake will be cold from the refrigerator, allow a few additional minutes of baking time.
- To freeze the finished bars, allow them to cool completely, chill thoroughly, and cut them into individual squares. Place parchment paper between the layers and freeze for up to 3 months.
- For the best texture, transfer the frozen bars to the refrigerator and let them thaw overnight before serving.