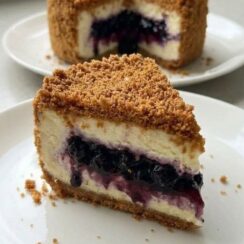
No-Bake Upside-Down Blueberry Cheesecake Recipe, Creamy and Irresistible
This No-Bake Upside-Down Blueberry Cheesecake is creamy, fruity, and finished with a delicious Lotus Biscoff crust!
Servings 10
Equipment
- Mold size: 15 cm x 7 cm
- Blueberry core mold: 10 cm
Ingredients
Blueberry Core
- 1 g powdered gelatin about ¼ tsp
- 5 g water 1 tsp
- 100 g blueberries about ¾ cup
- 18 g granulated sugar 1½ tbsp
- 5 g lemon juice 1 tsp
- 1 g cornstarch ¼ tsp
- 5 g cold water 1 tsp
Lotus Biscoff Crust
- 210 g Lotus Biscoff biscuits about 1¾ cups, crushed
- 40 g digestive biscuits about ¼ cup, crushed
- 80 g unsalted butter melted (⅓ cup)
- 1 g salt about ⅙ tsp
For Assembling the Crust
- 95 g crust mixture for the bottom
- 142 g crust mixture for the sides
- 95 g crust mixture for the top layer
Cheesecake
- 5 g powdered gelatin about 1½ tsp
- 25 g cold water 1 tbsp + 2 tsp
- 270 g cream cheese room temperature (about 1⅕ cups)
- 50 g granulated sugar ¼ cup
- 0.5 g salt about ⅛ tsp
- 3 g vanilla extract ⅝ tsp
- 55 g sour cream room temperature (¼ cup)
- Zest of ⅔ lemon
- 8 g lemon juice 1½ tsp
- 140 g heavy cream ½ cup + 2 tbsp
Instructions
Make the Blueberry Core
- Begin by blooming the powdered gelatin. Combine it with the water and leave it undisturbed for about 10 minutes, giving the gelatin time to absorb the water and soften properly.
- Place the blueberries, sugar, and lemon juice in a saucepan and cook gently over low heat. Once the berries have softened, use a spatula to crush them, then continue cooking briefly so the fruit becomes tender and juicy.
- In a small bowl, combine the cornstarch with the cold water until smooth. Pour this mixture into the blueberries and cook for another 30 seconds, stirring promptly and continuously as you add it.
- Add the bloomed gelatin to the warm blueberry mixture and stir thoroughly until completely dissolved and evenly incorporated. Pour the mixture into a 10 cm round mold and place it in the freezer for approximately 2 hours, or until firmly set.
Prepare the Lotus Biscoff Crust and Mold
- Place the Lotus Biscoff biscuits and Digestive biscuits in a zip-top bag and crush them into very fine crumbs. A food processor makes this especially easy. Take care to grind them finely, as larger crumbs can make the sides of the finished crust fragile and prone to cracking.
- Add the melted unsalted butter and salt, then mix until every crumb is evenly coated and the mixture comes together.
- Line a 15 cm round mold with a Teflon sheet or mousse cake strip. Measure out 95 g of the crust mixture and press it firmly and evenly across the bottom of the mold. Place it in the fridge for about 10 minutes to firm up.
- Next, take approximately 140 g of the remaining crumb mixture and press it around the sides of the mold, bringing the crust up to roughly 6 cm in height.
- For neat, sturdy sides, use a straight-sided cup to press the crumbs firmly against the mold. Smooth and compact the crust evenly all the way around, then place it in the freezer for 25 to 30 minutes.
Prepare the Cheesecake Filling
- Bloom the powdered gelatin by mixing it with the water. Let it stand for about 10 minutes.
- Place the room-temperature cream cheese in a bowl and mix until smooth and creamy. Add the sugar, salt, and vanilla extract, then continue mixing until well combined.
- Add the sour cream and mix until incorporated. Follow with the lemon zest and lemon juice, mixing until the filling is smooth and evenly blended.
- Warm the bloomed gelatin in the microwave for approximately 20 seconds, or until melted. Add it to the cream cheese mixture and mix thoroughly.
- Finally, add the heavy cream that has been whipped to about 50% and mix gently until the filling is evenly combined.
Assemble the Cheesecake
- Take the chilled crust from the freezer and spoon 220 g of the cheesecake filling inside. Smooth the surface carefully.
- Return it to the freezer for about 5 to 6 minutes, just long enough for the surface to become slightly firm. Remove the blueberry core from its mold and place it neatly in the center of the cheesecake.
- Pipe the remaining cheesecake filling around the blueberry center first, making sure there are no empty spaces. Then cover the top with the remaining filling and smooth it into an even layer.
- Scatter the reserved crust mixture evenly over the top. Place parchment paper or a Teflon sheet over the surface and use the bottom of a cup to press the crumbs down firmly and evenly.
- Refrigerate the cheesecake for at least 8 hours, allowing plenty of time for it to set properly. Before unmolding, transfer it to the freezer for about 1 hour. This will firm the outer edges and make removing the mold much easier.
- Place your serving plate over the cheesecake and carefully turn the cake upside down. Remove the mold, followed by the Teflon sheet or mousse cake strip.
- Do not warm the ring with a kitchen torch or hot towel. The heat can melt the butter in the crust, causing the beautiful crust to soften or break.
Storage
- Keep the cheesecake covered or stored in an airtight container in the fridge at 4°C, 40°F, or below. For the best texture and flavor, enjoy it within 3 days. The crust will be at its crispest and the cheesecake at its softest during the first 1 to 2 days.
- For longer storage, freeze individual slices in airtight containers or wrap them securely. They can be frozen for up to 2 to 3 weeks while maintaining good quality. Move the slices to the fridge the day before serving and allow them to thaw slowly overnight.
- Since this cheesecake is made with cream cheese and heavy cream, it should not be left at room temperature for long periods. After serving, return any remaining cheesecake to the fridge as soon as possible.